
Squarespace Courses 101: Your Complete Guide
If you’ve not heard, Squarespace has just released a new feature on your Squarespace dashboard: a Course Page! This is a game changer for coaches, teachers, and course creators looking for a way to monetize their knowledge.
You can now create limitless courses and sell them to your target audience at any pricing plan. As you already know Squarespace, they make everything easy and accessible. So, you don’t have to break a sweat to compile a promising course that you can sell and increase your business revenue.
I am here to explain everything you need to know about the new course page and how to create a course you can start selling immediately. Are you ready to increase your business revenue and create valuable courses for your target audience? If yes, then let’s dive in quickly!
If you are new to Squarespace or wondering whether Squarespace is the best website builder for your business, check the Squarespace for Business article.
What Is A Course Page?
In simple terms, a course page allows creators and website owners to create a series of materials following a sequential order to impart knowledge or teach a skill. The courses can be in different formats: a file, videos, text, or audio. In exchange for the knowledge, a standard fee has to be paid by students to access the course.
In other words, it is an avenue for professionals to make money by impacting their knowledge and skills. Fortunately, if you currently host your business on Squarespace, you can create as many courses as you want from your Squarespace dashboard. Let’s look at how you can get started.
How Much Does It Cost To Create A Course Page?
You will need a business plan or above to sell courses and I’ll be charged a 9% transaction fee on every course sale. Alternatively, Squarespace provides digital add-on plans, allowing you to sell your site's digital products.
Signing up for the digital plan comes with its own perks. You can access extra video storage, reduced or no transaction rates, and more. Fortunately, three digital plans are available to cater to your digital needs, depending on your business size.

Starter ($9/month)
This plan gives you access to
7% transaction fee for digital product sales
10 hours of video storage
Unlimited courses and memberships
Core ($34/month)
You have access to
3% transaction fee
50 hours of video storage
Unlimited courses and memberships
Professional ($119/month)
You have access to
0% transaction fee
Unlimited video storage
Unlimited courses and memberships
If this will be your first course, you can start with the business plan, and see how your sales go before signing up for the Starter plan. However, you’d have to deal with the 30-minutes video storage limit on your business plan (A way to navigate this limit is to embed videos)
How To Create Your First Course Using The Squarespace Course Page
Step One: Accessing The Course Page on Your Squarespace Dashboard
The first thing is to log into your Squarespace website dashboard.

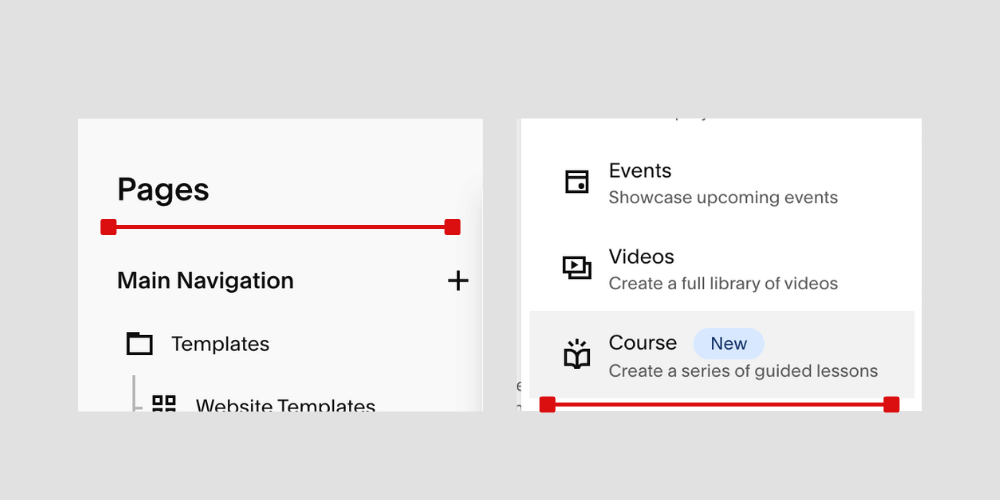
Next, click on Websites. It will take you directly to the pages on your website since you will be creating your website from scratch. Scroll down to the Not Linked pages and click on the + icon.

You will see various pages and collections you can create on Squarespace. Scroll down and select Courses.
Next, Squarespace will present you with two layout options to choose from. You can select any because Squarespace allows you to edit layouts, which isn’t a problem.
Now! You’ve successfully created a course page. That is excellent progress. Let’s move on to various elements that constitute the course page.
Step Two: Understanding How The Course Page Works

Before you dive into creating lessons, let’s take time to understand how to navigate through a course page. The first thing you’ll notice after creating your course page is the course page menu: Pricing Plans, Course Overview & Course Content.
Course Overview
The course overview page is the landing page of your courses. The default information that comes with it is
A short description of what the course is all about
A progress bar
Start Course CTA button
An overview of your chapters and lessons
Meet the instructor section
What’ll learn section, and
Course FAQ
It is the first page buyers interact with to get more information about the Course’s chapters and lessons if they finally invest in the course. You can also provide more information about the instructors, what they should expect, and answer frequently asked questions. The good news is, you can edit this page to suit your content goals. However, here are some helpful tips to help you design a good Course Overview.
Progress bar: The progress bar allows learners to track their progress in the course. It is measured in percentage and increases as the number of watched lessons increases. This is a good addition because it shows the learners they are making tangible progress.

Tips For Designing A Converting Course Overview
Write a compelling course introduction: Course introduction is the first thing to focus on when editing the Course Overview page. Pay attention to the copy and ensure it is compelling and attractive enough to convince prospective buyers to pay for the course. So, beyond describing what the course is about, ensure that the introduction answers the pain point of your target audience.
Create a Testimonial section: If it isn’t a new course, you can create a testimonial or review section highlighting customers' positive comments. One marketing strategy that gets buyers to pay for a product is testimonials, so it is worth taking seriously.
Pay Attention to FAQs: Consider the possible questions about your course, and ensure you answer these questions satisfactorily. Questions such as: What will I gain at the end of the course? Is it a video or audio course? Etc.
Give Them A Sneak Peak Into The Course: To further convince your prospects, you can attractively explain what they will learn in the course or record a 30-second to one-minute video of some things to expect. Fortunately, the Course Overview page comes with a summary of the course’s lessons.
Note: Like any other page on Squarespace, the course page can be fully edited. You can add sections, blocks, and so much more.
Course Content

The next page on the course page is the course content, and it houses all your course lessons. Note that your audience can only access the course content once they subscribe. The course content page consists of chapters and lesson pages.
Lesson Pages: The lesson pages hold the content of each lesson and allow buyers to interact with the content. The lessons may be in various formats, such as files, videos, audio, etc.
Chapter: This is a group of lessons discussing a specific part or subtopic of the course. Grouping your lessons into chapters allows easy navigation and a sense of progress in the learner’s path. However, they are optional when creating your lessons, so you can decide whether to group them into chapters.
Pricing Plans
The last subpage on the course page is the pricing plan, allowing you to set a recurring or fixed plan for your course and other digital products. More on that later in the article.
Now that you know what each subpage does, it is time to create your first lesson.
Step Three: Set the course goals

You’ve created a course page and you understand what the sub-pages are about. It is time to get your hands dirty and start your course creation. However, before you can create a course, there are a few questions you should consider.
What is the course all about? Having a clear goal you want buyers to achieve with the course will give you a detailed perspective on what the course will be about. Ensure you know what problem you want the course to solve for its buyers.
What will be the format of the lessons?? The next question is to determine what lesson media format you’d be using. Will the lessons be videos, audio audio, text, or a mixture of all?? Outline how you want each lesson to look. Will there be downloadable resources, and will there be assignments or collaboration forums? Having all these settled makes the lesson creation success easy.
What payment plan is perfect for the course?? You can go for free access in exchange for emails, a fixed price, or a subscription plan. The type of payment plan you choose depends on the course goals, the value of the lessons, and additional resources.
Step Four: Create Your Lessons
Squarespace allows you to add up to 250 lessons on a course page, so you do not need to worry. Also, each lesson page enables you to add blocks and sections. So, you can add videos, audio, text, images, and so much more.
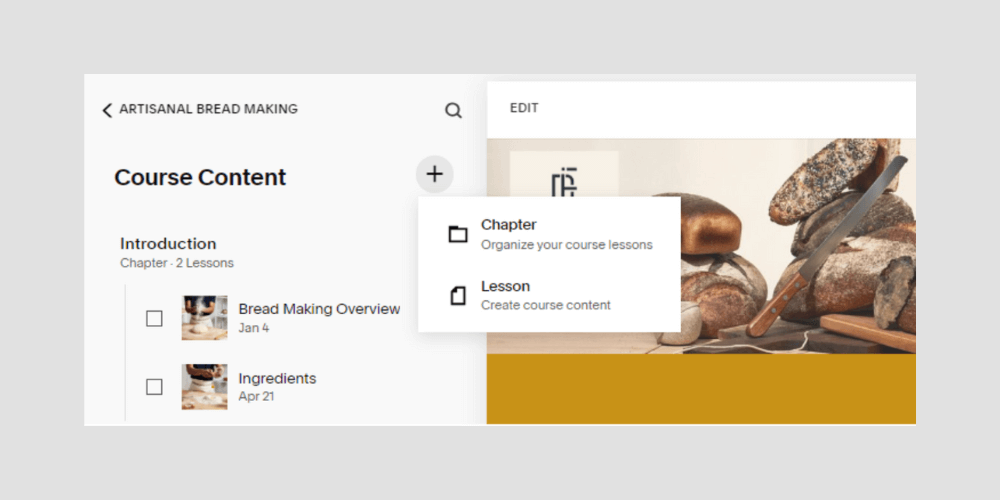
The first thing to do is to click on the course page you want to add the lesson. Next, locate the page’s menu and select Course Content. If you use one of the layouts, there will be demo lessons, remove the demo lessons and click on the plus icon.
There are two options to choose from: Chapters and Lessons. Click on Chapters if you want to group your lessons, and you already know the number of chapters you want to include in your course. If still unsure, click on Lessons.
You can always create chapters later and group lessons by dragging them under the chapters. So, for the sake of this article, we will create a lesson first. Therefore, select Lesson.
You will see a menu divided into three categories: General, Video, and Status.

In the General tab;
The first thing is to enter the title of the lesson. Make it concise.
The next thing is to enter an excerpt. Note that an excerpt is a short lesson description and will be displayed on the course overview and summary blocks. Therefore, ensure it is nothing more than 500 characters. Make it short as well.
Custom URL: Squarespace will automatically generate a URL containing your lesson's title. If you are not satisfied, feel free to edit the URL.
Thumbnail: This serves as the lesson's image and will be displayed on the Course Overview and the Summary blocks.
Video Tab
This is for lessons that will be in the video format. If you won’t be hosting your lessons in the video format or are thinking of embedding the video, then you can turn the show lesson video off. Also, you can add a custom image for social sharing.
Note: Your video storage limit is dependent on your plan. You get a minimum of 30 video storage and a maximum of three hours of video storage. If you need more than this, you can subscribe to the video digital plan Squarespace offers. You can buy any of the 10, 50, or unlimited video hours digital product plans.
If purchasing Squarespace’s digital product plan isn’t on your list, the best alternative, if you offer video lessons, is to use other platforms like Vimeo or YouTube to host your videos and embed them on Squarespace. To learn more about Squarespace Video options, Check out the Squarespace Video article.
Status
The last tab is the status tab. You can save your lesson as a draft, publish it, or schedule it for later.
Once you add all the necessary information, click Save, and your lesson is ready.
How To Embed A Video

Suppose you are hosting your videos on another platform and want to add them to your lesson pages. It is simple. Click on EDIT on the top left corner of your lesson page.
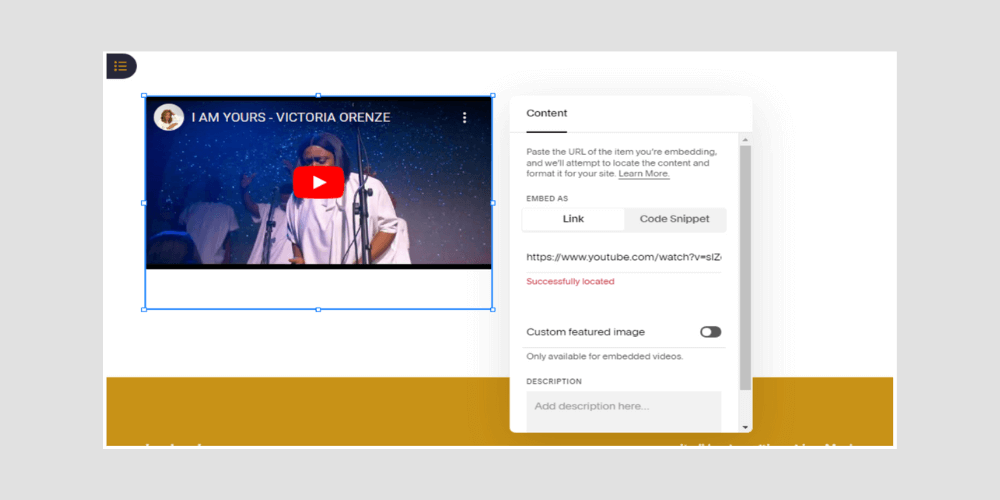
Next, Hover over the section you want to add the video block. The add block option will pop up. Click on it and locate embed.
Click on Embed, then copy and paste the link of your video into the space provided for a URL.
Automatically, the video will be located and displayed on your lesson page.
You’ve successfully uploaded your lesson video to the page. Therefore, determine the best format for you, and go for it.
Remember that Lesson pages are similar to other types of pages on Squarespace, so feel free to add blocks and sections and edit to your satisfaction. You can use the text block to include more information about the course, embed audio, attac transcripts, and so much more.
Now that you’ve created your first course, repeat the same process for all the courses.
Step Five: Create Chapters

To make navigation easy for your students, the next thing after creating your lessons is to group them into chapters. Creating Chapters and grouping your lessons is an easy process.
Go to the course page. Select Course Content, and click on the + sign. Out of the two options, select Chapter.
The next thing is to enter the chapter's name and click Save. Create all the chapters required for the lessons.
To group each lesson under the chapters, all you need to do is drag and drop individual lessons under their respective chapters, and that’s it. You’ve successfully organized the lessons into various chapters, and the chapters will appear on the Course Overview page.
Note: The chapters appear on your Course Overview page exactly how you’ve arranged them. Therefore, ensure they are arranged progressively to avoid mishaps.
Step Six: Style Your Course Page
The tedious work is over; it's time to make your course page more aesthetically pleasing. You can edit your course page and change layouts and styles. Various options are available, such as changing colors and fonts, adding CTA buttons, and more.
related article: 12 Best Squarespace Alternatives To Build A WebsiteWhen editing your course page, keep these in mind.
Maintain a sharp contrast between the background and elements: You don’t want your student to have difficulty reading your text or finding the CTA button. Therefore, ensure that the colors used for the text and background stand out and can be seen by everyone, including people with disabilities.
Leave Enough Whitespace: We all know how crowded a room makes us feel; the same goes for your lesson pages. There shouldn’t be too much going on. Let each element have enough space between them, and if possible, avoid crowding up your Course Overview and lesson pages with too many texts and distractions. Please keep it simple and clean.
Stick To Your Brand’s Theme: It can be tempting to go for a new design approach for your courses, and it is not a bad idea. However, maintaining brand consistency throughout your website, including your course page, can increase trust and build professionalism. Stick to your brand colors and fonts for a uniform look.
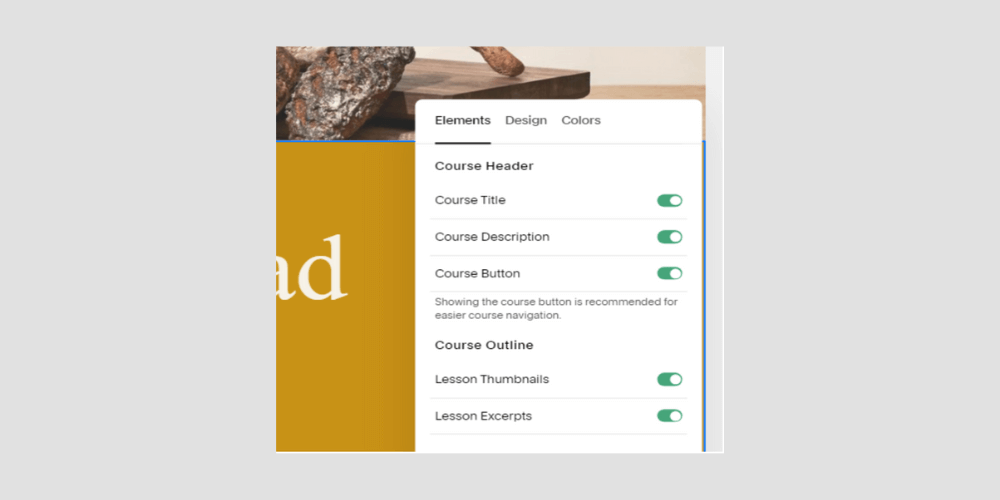
On your Course Overview page, you can decide to
Turn on/off your lesson excerpts
Turn on/off lesson thumbnails, buttons, or header
Align the text, increase/decrease padding g
Change colors, etc.
To edit your course overview page, click EDIT in the top left corner of the screen, and you are ready. You can also move sections around the page.
The same style changes apply to individual lesson pages. Squarespace gives you enough design freedom to build functional and visually appealing course and lesson pages.
related article: Squarespace Vs Shopify: Which Platform Is Best For Your Business?Step Seven: Set Up Payment Plans
Congratulations! You are almost done. The second to the last step before hitting publish is to set up your payment plans. Depending on your Squarespace plan, you may have to upgrade or continue setting up your payment plans.
Note: You can set up pricing plans and sell digital products from the Squarespace business plan and above. You may need to upgrade if you are currently on the Personal Plan.
Pricing Plans come in different types, each suitable for specific needs. You can create
Fixed Amount: This will only require customers to pay a one-time fixed amount for lifetime access to your course or other digital products. They also have the option to pay once or in installments.
Subscription: This allows your customers to pay on a recurring basis (weekly, monthly, annually), and their access will be restricted once their subscription expires
Free: Your customers can access your courses for free, but they would have to create a customer account.
Squarespace also allows you to create tiered pricing plans, which is perfect if you offer multiple pricing plans.
related article: Squarespace Pricing Plans: A Complete GuideHow To Create A Pricing Plan For Your Course
Click on Pricing Plans on the Course page Menu. Squarespace Squarespace will bring up a menu where you can fill in your Pricing Details.
In the Details section, you will have to fill
Title of the pricing plan
A short description of the plan (optional)
Benefits(optional): Make it short and precise.
Under the Pricing tab
Select a pricing structure: Do you want it to be free, fixed, or subscription-based?
If you are going for a fixed payment, confirm whether you will allow installment and the number of times. For the subscription pricing plan, select the frequency (weekly, monthly, or annually)
Under the Signup Limit section, you can decide whether to set a date limit for enrollment. This is optional, but it is perfect for organizing live classes.
Under the Included Products, you can add more digital products to your pricing plan if they are ready.
Once you are done filling in all the necessary information, click on Create, and students can only get authorized access to your course once they pay.
Note: As you add more value to your course, there may need to change the prices from time to time. Therefore, you can always review and change the pricing plan anytime on Squarespace.
related article: Squarespace Scheduling: The Ultimate Guide For Small Business OwnersTips For Setting Up Your Course Prices
Know Your Value: The time spent creating courses doesn’t equal its overall value. If you are a renowned expert in your field, and you know that the course you’ve designed will tremendously impact the lives of any buyer, then setting a considerable amount for the course is a good idea.
Know Your Market Value: How hard is it to get a good and comprehensive course on the niche you are venturing into? Is the market saturated with a plethora of free and paid courses? What is the market value for your course niche?? Considering this will also help you determine whether to increase or lower your course fee. Choosing a saturated niche may affecting your course pricing, so count the cost before setting the price.
Make it easy for students to pay: Beyond the excitement and the dying need to buy the course, finances may be the final obstacle stopping your students from buying. Therefore, if it aligns with your course goals, you can make payment easy by allowing students to pay installmentally.
related article: 25 Best Squarespace Templates For Virtual AssistantsConclusion
Squarespace new course page is an excellent tool for course creators to increase their revenue and share their knowledge. You don’t need to worry about hosting your courses elsewhere. You can create a course page and add the necessary lessons with a few clicks. Also, the ease of payment is an advantage for directing prospective students to your Squarespace site.
So, what are you waiting for? This is the best time to start creating your course. I hope you fully understand how to create your course and lessons page. Cheers to your new course!
